We’re here to help
Let us help you
Calibrating a pressure gauge is a critical process that involves comparing the gauge's readings to a known and traceable standard to ensure its measuring pressure accurately.
Read on to discover what a pressure gauge calibration process entails and why it’s an important part of pressure gauge precision and stability, as well as industry safety and compliance.
A pressure gauge is an mechanical test instrument for measuring and monitoring the pressure generated by air, fluids, or gases. They operate using the system’s process, giving you a gauge pressure reading even when no power source is present.
Pressure gauges are used to monitor and control pressure levels in many different types of applications, including HVAC systems, plumbing and water systems, and measuring tyre pressure. However, different types of pressure gauges are used depending on the application.
We’ll cover the different types of pressure gauges and their functionality shortly, but first we need to understand the different types of pressure before being able to specify gauges or perform a calibration.
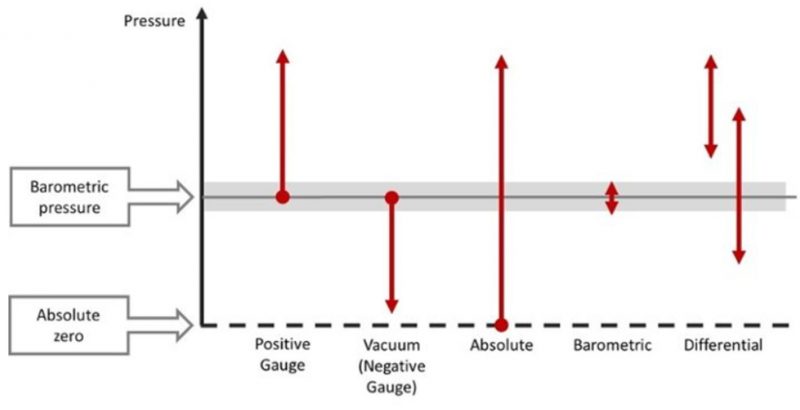
This is the most common pressure that is measured and is referenced against the current barometric pressure. In other words, the difference between the measured pressure and that of the current barometric pressure.
Gauge pressure can be positive or negative, and measured in several units of measurement, including bar, kPa and psi. Typical gauge pressure applications include car tyre and water level measurement.
Absolute pressure is the pressure referenced from an absolute vacuum — i.e. there are no air molecules left. It’s the sum of gauge pressure and atmospheric pressure, and can only be positive as the reference is absolute zero (100% vacuum).
Absolute pressure measurements are crucial for barometric and metrological applications such as weather forecasting.
As the name suggests, differential pressure is the difference between two pressures (independent measuring points) and can produce a positive or negative result. Common examples of differential pressure gauges and applications include:
 Diagram showing types of pressure measurement: positive gauge, vacuum (negative gauge), absolute, barometric, and differential, with references to barometric pressure and absolute zero.
Pressure gauges come in a variety of types, sizes, and accuracies which can be either mechanical or electronic.
The most common type of mechanical pressure gauge is the Bourdon Tube.
Bourdon tubes are oval in cross-section. The pressure created by the gas of liquid acts on the Bourdon tube and produces a movement at the end of the tube. This is then transferred by the movement to the dial on the front of the gauge.
Mechanical pressure gauges such as Bourdon tube gauges are less accurate than digital gauges — a typical mechanical gauge might have an accuracy of 1.6% of full scale but could be between 0.1 and 4% of the measured range.
Labelled diagram of a Bourdon tube pressure gauge showing internal parts: Bourdon tube, link, toothed segment, movement, pointer, dial, and socket.
Developed for measuring air and dry gases at extreme low pressures (as low as 16 mbar), capsule pressure gauges houses a sensitive capsule element to detect pressure changes. The sensitive element is built up from two diaphragms welded together to form a capsule. When pressure is applied, the capsule deflects inwards or outwards, providing an accurate measurement.
Diaphragm pressure gauges are used to measure low level pressure of gas, steam, and fluids. They work on the same principle as the bourdon pressure gauge, but instead of a flexible tube, use a flexible diaphragm element as its primary sensing element.
Also known as a Shaeffer gauge, a diaphragm pressure gauge can measure as high as 40 bar to -1 bar in applications such as monitoring pressure in gas canisters.
These most commonly work using strain gauges, in a similar manner to load cells. A strain gauge is embedded in the diaphragm of the gauge. As the diaphragm deforms, this causes the deformation of the strain gauge which alters the resistance. The resistance is proportional to the applied pressure.
A Wheatstone Bridge circuit is used to measure this resistance and by the means of calibration, the resistance values are assigned to a pressure unit of measurement. The pressure sensor can have a digital display attached to it, making a digital pressure gauge or can be manufactured to output its measured pressure as a current or voltage (the most common being a 4 to 20mA current loop).
Digital pressure gauges and pressure sensors are generally higher accuracy than a mechanical gauge and do not suffer significantly from hysteresis errors. A typical accuracy might be 0.1% of full scale, though there are also digital gauges on the market that are 0.05% of the measured range.
There are two main methods of pressure gauge calibration.
This could be analogue or digital. The pressure medium could be a fluid, such as oil, or a gas, for example, air or nitrogen.
Advantages:
Disadvantages:
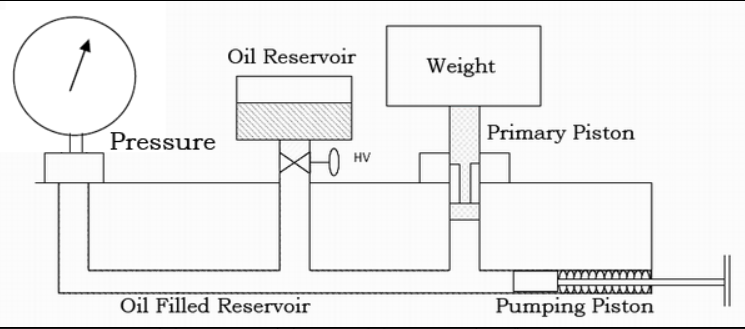
A deadweight pressure calibrator is the most accurate type of calibration standard and considered a primary calibration device. They are supplied with a number of weights and a piston. The pistons area is very precisely measured and the weights are highly accurate.4

Diagram of a dead weight tester showing pressure gauge, oil reservoir, pumping piston, primary piston with weight, and connecting oil-filled reservoir.
Deadweight testers generally use oil as the calibration medium. However, they can also be purchased to operate with air or water.
Advantages:
Disadvantages:
This is a very similar calibration procedure to a standard pressure gauge.
This is a similar calibration procedure to a pressure gauge.
Follow steps one to five of the calibration procedure for a pressure gauge. As there is no display with a pressure sensor, the output of the pressure sensor is measured. Depending on the design of the pressure sensor and that of your calibration equipment, it may require a separate power supply.
Generally speaking, if it’s a 4 to 20 mA output and you're using a modern multifunction calibrator, such as a Fluke 725 or similar, this will also power the sensor.
As a bare minimum, your pressure gauges should be calibrated annually, otherwise they’ll drift out of specification. On the other hand, more-frequent calibration intervals (every three to six months) are recommended for pressure gauges subjected to heavy usage and/or hash environments. Similarly, the timing of pressure gauges used in critical fields like biotechnology and pharmaceutical applications should be decreased.
While the decision ultimately lies with the end-user, our engineers are always happy to offer expert advice.
All forms of calibration require certification and constant quality checks. We are certified to carry out pressure instrument calibration and regularly update our certifications to provide added peace of mind. An example of a pressure gauge calibration certificate can can be seen below:
AL441825760-17Dec2020-Pressure - Vacuum Gauge-315820-2-
If you are looking to get your pressure gauges calibrated so they remain within tolerance of their manufacturer's specifications, then please don’t hesitate to contact us. If you need assistance outside of the UK regular working hours, please use our contact form and we'll be in touch ASAP.
This post is not intended to replace the guidance listed in any of the national or international standards. The correct calibration of pressure gauges and sensors is a skilled task and the requirements of the relevant international standard should be fully understood and followed. The post doesn't attempt to describe the health and safety implications of working with high-pressure systems which can be deadly if not worked on in a safe manner.
Let us help you